

If a chicken drank a can of Red Bull, stepped in ink, and “Gangnam Styled” all over sheets of lined paper, the result would be: My handwriting. Seriously, it’s that bad. Everyone I know complains about it and no one can read it. So why on earth would I even consider using a wood-burning tool to create “art?” Wouldn’t a heated instrument, in my hands, bring worse results than a simple pen, which is also a lot less dangerous? Perhaps, but I couldn’t resist trying. Could I really be that bad? Was I a lost cause when it came to art? I’d soon find out.
My Admiration for Wood Projects: A Brief History:
I once watched in wide-eyed amazement as some “lumberjack artists,” armed with chainsaws and nothing but a tree stump, made intricately carved tables and chairs in seconds—right before my very eyes. I was probably six years old and I was at Sea World. I have no idea how this show and the dolphin/Orca shows went together as a “theme,” but I didn’t care. I went home dreaming of flying sea creatures and sawdust.
“Dad,” I said to my father the next day. “You have a chainsaw and there are plenty of trees and wood stumps around our yard. Could you make a chair just like those men at Sea World?”
“Sure!” he said. So, he took his chainsaw, split a 3-foot high tree stump almost all the way through, leveled out the bottom and gave it to me.
“Here’s the chair back,” he said, indicating where he had cut away an indentation to make a “back” for the stump. It was not intricate or “amazing.” I was disappointed—at first. Then, I sat in it all summer long, since it was just my size and I had learned to appreciate it.
Years later, I married Nate, whose family members actually did carpentry work and furniture making for both a hobby and a living. It takes more than a chainsaw to make a table and a chair—I know that now for sure!
A few years ago, Nate took a wooden bench and burned designs, patterns, pictures, and the words of a poem I had written right into the wood. Then, he added colorful brush-strokes of paint and a fine, glossy finish. I’ve been begging him to do more of this kind of work, but he just doesn’t have time. I, on the other hand, have more than enough time to maybe become an apprentice. Nate assured me I could definitely create something I would be proud of. He was willing to help.
Preparing for My Project:
1) Buy materials. Nate and I went to a crafts store and bought a hand-held wood- burning tool with multiple attachments for around $16.00. We also bought some decorative wood pieces that were already cut out into shapes. Finally, we picked up some paintbrushes, varnish, and acrylic paint.
2) Wrote a haiku. Haikus apparently are nothing to be taken lightly. They’re a deceptively simple art form, with a few rules and a long history. According to Faubion Bowers, editor of The Classic Tradition of Haiku: An Anthology, Japanese haiku were once 12th-century Renga or verses that were linked in song. They were “interlocking chains of 17 syllables (5-7-5), preceded or followed by 14 syllables (7-7).” A tercet or couplet could be its own poem. In the 16th century, this form grew in popularity with the “commoners” (Bower, Foreword). However, in the second half of the17th century, Bashō and his followers took the elements of surprise and humor and combined them with “a level of great sensitivity and dignity” (Bowers, Foreword). At this time, the 5-7-5 starting verse began to stand alone. The haiku, as we know it, is a 20th century term: Hai means “unusual” and Ku means “strophe, lines, stanza, or verse.” In 1968, the Haiku Society of America formed and spent 20 years writing over 20,000 letters back and forth between authorities to arrive at a definition (Bowers, Foreword). Haikus, in general, create a specific picture or image and tell a story. Often, there are contrasts: near/far; background/foreground; past/present; high/low; sound/silence; temporary/eternal (Bowers, Foreword). There’s typically a “what,” such as a sound, a smell, a taste, or a vision. The poem also addresses: “where,” which can be as simple as a lake or garden. Finally, the poem indicates “when.” Poets, in other words, can evoke a season or time of day (Bowers, Foreword).
I spent about a half an hour contemplating these ideas and came up with the following:
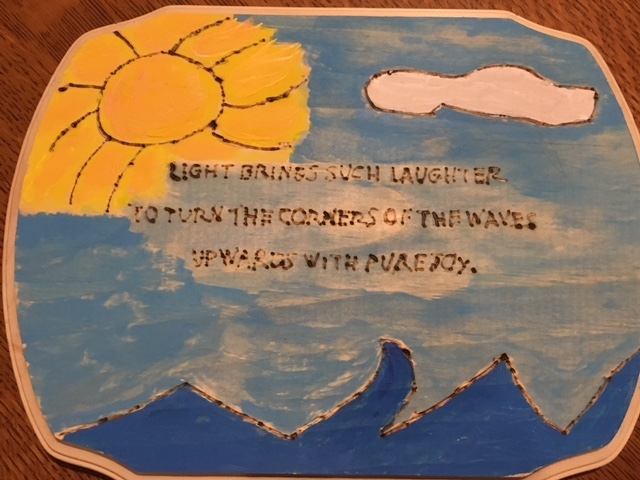
Light brings such laughter
To turn the corners of the waves,
Upward with pure joy.
I have no idea if it’s “good” or not, but I needed something I could stand to look at every day, since I think this project will reside in my home office: Something “peppy”—something “inspirational.” This poem, I think, will do for now.
3) Watch a “how-to” video about wood burning. One of the first videos that pops up after doing an Internet search on YouTube is “Dylan’s DIY Workshop: (The Basics): How to Wood Burn.” Dylan is an amazing young man who goes to school full time, works 30 hours a week, and tries to find time to make wood-burning tutorials. In this first video in a series, he goes through the many kinds of tools you might need, safety tips, how to make lines and circles, how to create “shading,” and how to use carbon paper to make images if you’re not an artist. He is certainly talented!
4) Decide that it’s time to stop watching videos and just start making things.
Making My Project:
Wood burning, according to Kathleen Menendez, an artist who studied in Guatemala, tells us that “wood burning” is actually called “pyrography.” (Pyro=fire and graphy=graphics/drawing). Her article, “Antique Pyrography” on the Carvers’ Companion Ezine Website, offers a brief history of the origins of this kind of artwork. According to sources she has found, this pyrographics may have dated back to the Peruvian Moche, who used pyroengraving between 300 B.C. and 700 A.D.
According to Menendez then, I was about to undertake a very ancient form. Oh, the pressure I felt!
Nate, very calmly, gave me some tips:
“Since your handwriting is a little questionable, you could print out your poem and then ‘press’ it onto the wood,” he said.
I thought this suggestion was incredibly wise, so I typed out my poem. Then, Nate showed me how to use a dark crayon to color the backside of the paper. I could then place the paper onto the wooden board and trace over it with a pen or pencil. The indentations left in the wood, could help guide my wood-burning tool.
Next, I plugged the wood-burning tool into an outlet in the kitchen. My wood-burning tool comes with a handy “stand,” which is important. When putting the tool down after burning, the tip is extremely hot. The stand keeps the tip away from any objects that might burn or catch on fire.
I only had to wait 4-5 minutes before the tool heated up and I could begin to burn the letters. This part was extremely difficult. Even though I managed to print neatly from the computer “model,” burning those lines takes a lot of patience and skill. I did a lot of frowning, moaning, and complaining as I attempted to burn the letters into the wood.
“It’s okay,” Nate kept saying. “Keep going, you’re doing fine!”
“Mom, it looks great!” Alex said.
I knew better, but I really appreciated the encouragement.
Next, I drew some simple shapes with pencil onto the wood and blundered my way through tracing them with the wood-burning tool. Finally, I selected, mixed, and painted colors with the acrylics I bought. I let the entire project dry before varnishing it later in the afternoon.
At the end of the day, I could admire my project because, if nothing else, I stuck it through and learned a thing or two. Would I actually display it? I think I would—until I got sick of it. Then, I’d hide it—tucked away safely—inside Nate’s wood-burned bench, perhaps.
Your Turn: What’s a project you’ve always wanted to try, but were afraid to attempt? Share and discuss!

That’s really a nice piece..We are in the same boat..I wouldn’t dare to attempt any art or sketching because my daughter is very good at it and she gives me a complex!
LikeLiked by 1 person
Thanks! I very much admire those who can sketch or do any kind of art with their hands. Your daughter sounds very talented!
LikeLiked by 1 person