

The card selection at most grocery stores forces me to make my “puke face.” When searching for “condolences” or “sympathy” cards, I cringe at the tasteless messages I’d never send even my worst enemy (e.g. “The loss you weep, becomes a treasured memory to keep—forever.” ???!!!!) So, I decide I should take matters into my own hands. I’ll bet, with a little ingenuity, I could make a few thoughtful cards on my own.
My first step is to make the paper. According to the Silk-Road Foundation, which holds lectures at Stanford University and promotes education, research, and cultural exchange, the “accepted date” for the invention of paper in China is 105 A.D. However, according to the foundation’s website, researchers and archaeologists have discovered evidence that pushes this date 200 years earlier. Ts’ai Lun, an official of the Imperial Court, broke apart mulberry tree bark and prepared a pulp that was later flattened into sheets. It was soon discovered that hemp fibers and fishnets could improve the pulp (silk-road.com, 2017). As the “Silk Road” developed and blossomed as a trade route, paper played an important role. According to Jonathan M. Bloom in an article titled “Silk Road or Paper Road?” paper is “perhaps the most important product carried along this trade network” (2005).
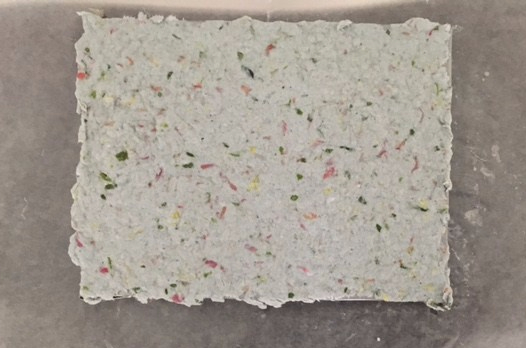
Ironically, I’m beginning with paper in order to make paper. I use the remnants of student compositions I’ve marked up, returned electronically, and no longer need. They also have been fantastically, superbly shredded into unrecognizable bits. To liven things up, I decide I can add in some leftover Mother’s Day flowers that have started to turn, but that still have a few bright spots here and there. These flowers, I believe, could add some pops of color to the pulpy mass.
Now, I just have to turn the bits of paper and flowers into a sheet of earth-inspired loveliness. According to Tinkerlab.com, any child can make paper—and it’s fun. However, adult supervision is strongly encouraged. Since technically I’m an adult, I don’t need supervision, but I grab Nate just in case. According to Tinker Lab, I’ll need:
–paper—torn or shredded into bits
–a blender
–a “screen”
–a large tub
–some kind of clean rag
–water
Apparently it’s possible to buy a screen, but I can’t seem to find one in stores. They’re easily found on the Internet online, but I decide I’ll make one from scratch after I watch a YouTube video posted in 2014 by “paperslurry.” The video is called “Make a Mould and Decker for Handmade Paper—Cheap.” All I need is:
–Hardware cloth. (No one at Lowe’s knows what this is. Trust me. I’ve asked. So, I didn’t buy it.)
–Window screening. (No one at Lowe’s knows what this is either, so I wandered the aisles and stumbled upon a roll of aluminum screening. I think it’s aisle 6 or 7.)
–Two wooden picture frames. ( I chose 5×7 frames and I ended up using only one.)
–Weather strip tape. (I ended up not using it.)
–Duct tape.
–Staple gun.
First, I remove all the glass and hardware from one of the picture frames. I’m supposed to also prep and stain the wood so that I can use it over and over again. I didn’t see that step until after I made the whole thing—oh well. Then, I roll the aluminum screening out just slightly larger than the picture frames and trim the screening with large, sharp scissors.
Next, I use the staple gun to staple the window screening to the frame. It is important to use lots of staples in order to ensure that the screening is taut. When my hand gives out from too much stapling, I pass the job onto Nate. Glad he’s here!
Finally, I can cover the edges of the frame in duct tape to help ensure a smooth edge for the paper I’m going to make.
$50.00 later, I have a screen I can use again and again—if I bother to stain and finish the picture frame. (The screens I’ve seen online are probably only about $20-$30, so I think I should have ordered one online.)
With the screen completed, I can move on to the next steps from Tinker Lab. I basically dump the shredded paper into the kitchen blender. How much? I don’t really know. I read and shred a lot of student papers! I just kind of fill the blender ¾ of the way full. Then, I use regular tap water to cover the paper. The mixture fills the blender all the way full. Then, I pulse the mixture on “low” for a while, but then I just get impatient and a bit daring and start blending like a maniac. The mixture looks splendid!

I can now pour the entire mess into an aluminum-baking pan and insert the screen I just made. I use my hands to scrape the pulpy mixture into the center of the screen and even it out. I use the cloth to press on the screen and squeeze as much water out as I possibly can. Finally, I can let the screen and the pulp mixture dry overnight. My mixture is pretty thick, so it takes four days for the entire project to dry.
Using clear, adhesive labels, fed into my inkjet printer, I run off a message of my own choosing and creation. It’s personalized, heart-felt—and, with any luck—does not trigger the gag reflex.

Your Turn: Do you like to give or receive cards for special occasions? Do you choose or like simple messages/pictures, blank cards, or long verses of rhymed poetry? Discuss and share!

Ingenious way of making cards…lovely!
LikeLiked by 2 people
Infuriatingly clever.
LikeLiked by 2 people